- If using pipecleaners twist two together to make one thicker shape.
- Thread the two beads onto the bookmarker and glue so that the smaller bead, (the head), is on the end of the strip and the larger bead, (the body), just below it. You should have a long tail of bookmarker strip below the bottom bead.
- Glue your wobbly eyes on to the top bead (the small one)
- Decorate with imagination.
- Your bookmark companion will sit on top of your book happily reading when you aren't (and sometimes even when you are)! :)
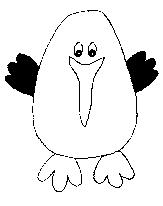
- If you use wooden beads you can make a neat kiwi bookmark by cutting a long yellow beak and set of large yellow feet out and attaching.
- You could also make an owl bookmark like this - owls have a special association with the Brownie section - and New Zealand has a special little owl called ruru (or morepork).
- If you want to make a little person as your companion leave a small bit of shoelace sticking out the top and it can be frayed for hair. A small bit of pipecleaner out the top can be bent over for a mohawk and coloured brightly with markers - or bits of felt / wool can be added for other effects.
- You could even use neutral beads and colour them to look like the guide uniform in New Zealand (or another country :) )
- Use your imagination and have fun!!
Sheep
 Materials:
- sheepskin OR black felt and natural carded sheepswool (as used for spinning)
- black felt (for head and legs)
- pair wobbly eyes per sheep
- craft glue
Method:
- If using sheepskin cut your body out using pattern 1.
- If using carded wool and felt cut your body out of black felt using pattern 2 and carefully glue on a reasonable amount of carded wool.
- Cut a small sheeps face out of black felt using pattern 3.
- Glue 2 small wobbly eyes per sheep onto face.
- If using sheepskin cut out a pair of legs from black felt using pattern 4, and carefully attach to back of sheepskin so that they peek out underneath.
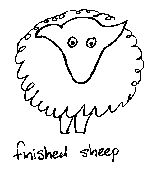
- Carefully glue face on to sheep - positioning towards the top as in finished picture.
- Attach to hat with a safety pin or attach strip magnet on the back to use as a fridge magnet.
Information:
Although NZ has lots of sheep per head of population - this number is now (as of 1996) exceeded by Australia - so enough of the sheep jokes!! *grin*
Tipare (traditional flax headband)
Materials:- Strips of flax or
- Strips of paper each about 1 cm wide - construction paper works fine
- A little patience to begin with
- Take two strips of flax (or paper).
- Form one into a "V" and thread the other through it. Make the strips of uneven length so that later as you add new pieces they are not added all at once. (This will make sense after you have tried making one ;) )
- With your straight piece through your "V" so that the right hand half of your "V" is on top of your straight strip we will number the strips from left to right 1,2, 3, 4. It may help to pencil the number lightly onto strip ends the first time you attempt this plait.
- Bend strip 4, [the strip on the right], over 3 so that it is parallel to 2.
- Bend strip 1 under 2 and over 4 so that it is parallel to 3.
- Bend strip 3 over 1 so that it is parallel to 4 and 2.
- Strip to under 4 bend over 3 to be parallel to one.
- Continue steps D and E. When a new strip needs to be added - overlap it on the original strip for about four cm. Weave the double strip and cut off ends later. Weave enough to fit around your head and leave 12 cm of each strip unused.
- Bend into a ring. Take one 12 cm end strip at a time and follow the over and under path at the beginning end. Follow 3 under and overs. Leave the end hanging. Weave all four strips back into the beginning.
- Pull up evenly and weave in ends until the band is firm. Trim all ends. This should join the ring "seamlessly"
Information:
Flax is a New Zealand native plant - not the one used in other parts of the world to make linen. It's Maori name is harakeke and it's botanical name is Phormium tenax. Harakeke and harakeke fibre were used (pre-European and during early European contact) to make many highly functional and beautiful everyday items including shoes and clothing within Maori society. As it was such an important plant there are many customs about the handling and care of flax which are still adhered to today.
Woozle
Materials:- 1 large red bead
- 3 pieces 28cm long, red wool
- 3 pieces 16cm long, red wool
- PVA glue
- hairclip (bobby pin type)
- felt pen.
Method:
- Thread wool on to hairclip so that hairclip is in the middle of the lengths of wool.
- Pull through bead so that the loops are sticking out about 1cm.
- Remove hairclip and put some glue where the loops come out of the bead (to stop it pulling out).
- Plait 2 arms with the ends of the shorter wool lengths, and two legs with the ends of the longer wool lengths.
- Paint a face on the bead.
- Clip through loops at top to make hair.
Information:
The much-loved Woozle is the NZ Ranger section mascot and is made in an endless variety of ways. She is fun loving, very red (the Ranger section colour), and a good person to have around in a tight spot. Her likeness can be found all the way through the NZ Ranger Handbook and also on various blanket patches available from the NZ Guide Mail order service.
Sources and Acknowledgements
Te Rama - The Magazine of Guides New Zealand.August / September - Volume 4 - 1995 p.31 (Woozle)
My thanks also to Cheryl W. for some international swap patterns; to Raewyn K. for letting me use her instructions for the pompom kiwi rather than having to create a set from scratch; to Sallie Z. for giving me the mental exercise of working out tipare instructions without pictures so her GSUSA troop could make them for Thinking Day 1996; and to Janet O. both for the inspiration and basic instructions for the bookmarks and for unwittingly reminding me about a little owl bookmark we had at home when I was a kid.
Back to New Zealand guiding activities index
Back to Anne's Guiding Pages - Home Page
Last updated on
This page is not in any way an official Guides NZ page
 Materials:
 Materials:
 Materials: